Tools to master the Toolbox
pdfToolbox comes with a wide range of predefined preflight Profiles, Checks, and Fixups that cover common tasks. But sometimes you will need to adjust configuration parameters in them or create new Profiles from scratch. For a powerful and flexible automation solution, this often means dealing with many different parameters and trying to figure out which combination addresses your issue the best way possible. This usually requires applying them to a set of test files. You may then find yourself in a repetitive cycle of modifying the Profile, saving it, running it on a test file, and discovering that some configuration settings are not optimal. This iterative process not only takes time, but is also prone to errors, such as accidentally overwriting the original test file.
Fortunately, this challenge was addressed years ago with introducing the Test Mode in pdfToolbox.
What is Test Mode?
The Test Mode was introduced with pdfToolbox 10 and allows you to test your Profiles, Process Plans, Checks and Fixups (I will refer to all of them as “Profiles” in this article from now on) as you create or edit them directly in the respective editor. One of the advantages of Test Mode is that you can test your configurations without saving them, which not only saves time, but also avoids the risk of accidentally modifying the original file: When you click on the "Test" button, pdfToolbox duplicates the active document, runs the Profile, opens the Test Mode window and displays the result on the left side. This allows you to see the result immediately without having to choose a destination for the modified PDF file or worry about overwriting your original document. You can toggle between the original file, the result, and a "Diff" view that compares input and output. This way you can easily test the Profile you are currently working on and see if the result is what you expect, and if not, you can simply close Test Mode, modify the Profile and start the Test Mode again without having to save the modified Profile. A real time saver for anyone who needs to create or modify Profiles.
Over the last versions of pdfToolbox, the Test Mode has become increasingly more powerful, and with pdfToolbox 15 the possibilities have been improved even more. It would be beyond the scope of this article to go into all the features of Test Mode. But I would like to highlight some of the key features that can help you when creating Profiles in pdfToolbox (a complete list of all features can be found in our online documentation).
Test Mode features
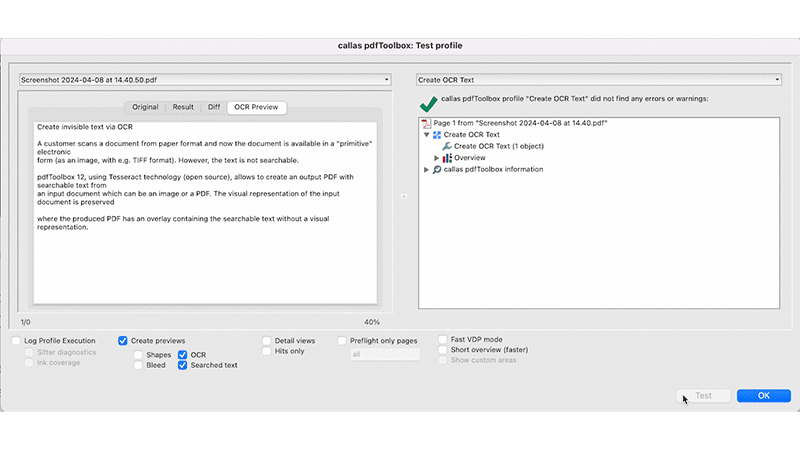
OCR text preview
When you add text to a scanned page using OCR (Optical Character Recognition), the text is added invisibly to the page. This PDF feature is smart, however, it has the downside that you cannot directly see the text that was added. If you run OCR in Test Mode, you will have an OCR view that shows you that text.
Log profile execution
Log profile execution is actually another tool that helps you create and understand Profiles. When used with a Process Plan, it creates a folder with temporary results and for each step. It can be enabled when you run the Profile but it is also directly available in Test Mode so that you can combine both tools which each other. When you exit Test Mode, all temporary files are automatically deleted to keep your system clean. For a detailed instruction into "log profile execution" please refer to our online documentation.
Shape preview
If a Profile generates at least one shape (for example, with a "Create and Apply Shape" Fixup or a "Shape Definition" Check), you can create a shape preview in Test Mode to see how the shape was created and to understand the result. To do this, select the "Shapes" checkbox and then run Test Mode again to access the new tab in the upper left panel. In this shape preview, the shape is always displayed in a bright red color. The toolbar at the bottom offers a transparency slider that lets you control the opacity of the page content so that you can better see where the shape was created on the page and how it relates to the rest of the page content.

Detail views
The Detail Views checkbox unlocks three powerful tools at once: Snap view, Layer view and Loupe view:
- In Snap view any object that you select in the results pane on the right will be displayed isolated from the rest of the page.
- The Layer view allows you to modify the visibility of all layers in the PDF. If you are modifying the layer structure of the original file it is also useful to check the results.
- The Loupe view should be your go-to tool in Test Mode if you want to analyze specific areas of a PDF page in detail. It allows you to zoom into the PDF preview page super-fast using your specified zoom factor. As you move the cursor over the PDF preview, the red crosshairs in Loupe View show you where the cursor is. In addition, the exact cursor coordinates are displayed at the bottom of the Loupe View window.
Hits only
This is a brand-new way to visualize objects identified by all preflight Checks of a Profile in a separate, reduced page view. Unlike the Snap view, the Hits Only view allows you to quickly identify all affected objects on any page in the document at a glance by simply scrolling through the pages. If more than one Check created a hit, all flagged objects will be shown. Note that this view only applies to snippet-based Checks. If your Check is page-based or document-based, this view will be empty. If no Checks have been applied or if none of the Checks resulted in a hit, an empty page will be displayed.