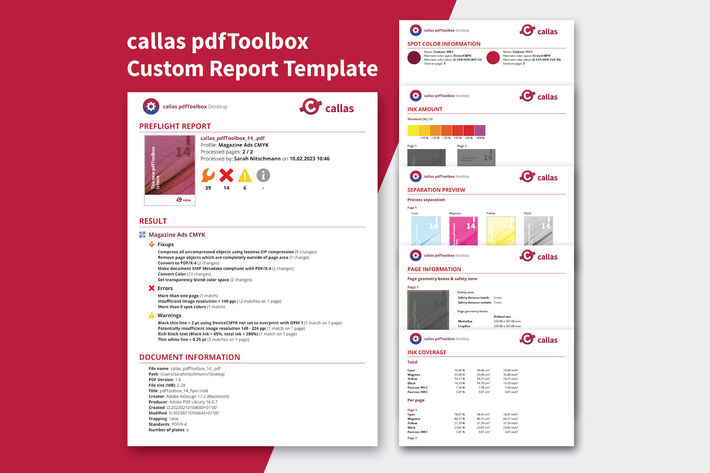
As you know, you can use pdfToolbox to preflight PDF documents. As a result, you get information about what is wrong and a list of things that have been fixed during preflight. You usually need a PDF report if you want to communicate this information to customers or colleagues. Creating PDF reports can be the sole purpose of a particular preflight step. pdfToolbox 14 introduces new features for PDF reports, including the ability to create optional pages with visually rich content. Check out this blog for everything you should know about the new features.
What's new in PDF reports?
pdfToolbox 8 introduced a customizable PDF report based on HTML templates, e.g. allowing you to adapt the report layout to your corporate design. This report includes an overview page with information about the preflighted document, the environment, and a list of Errors, Warnings and Fixups performed. pdfToolbox 14 goes further.
With the release of pdfToolbox 14, you get a redesigned layout for the overview page, which is now more concise. In addition, you have the ability to add five different optional pages to the report. For certain issues, it is difficult to judge whether a problem exists or not. In these cases, it is good to have a proper visualization of the issue. The new report now allows you to send such visualizations to others. Each of the optional pages addresses a certain problem area and provides individual imagery that helps the recipient to better understand the situation. Let's have a look...

Page information
This page generates a preview of the first document page with highlighted Trim- and BleedBox. This allows you to visually inspect the bleed area. In addition, the preview shows the safety zone inside of the page boundary to visualize whether any page object, such as text or graphic that does not extend beyond the page, is in this zone. The sizes of the page geometry boxes are also listed. If the document contains a page scaling factor, which is often the case with large format print files, you will also get the effective size of the page boxes. Finally, the page indicates whether all pages in the document are the same size or vary.
Ink amount
Do you want to know if your PDF document is using too much ink? This report page creates previews for each PDF page with a gray overlay and highlights any area that exceeds the specified threshold: yellow for small overruns, progressing to red and purple for large overruns. This allows you to immediately identify problematic areas in the PDF and prevent potential problems during printing.
Spot color information
This report page can be used to visually inspect all spot colors in the document. Each spot color is represented by a color patch and contains information about the spot color name, color value, color space, and the pages where it is used. Perhaps a color was accidentally created as a spot color and should be a process color instead? Or maybe the spot color names for bleed and varnish were not defined correctly in the document? Whatever the problem may be with spot colors, this page gives you a good opportunity to review this important subject.
Ink coverage
If you want to predict how much ink you'll need for a particular job, this page has all the answers. It shows the ink usage for each color channel (CMYK and spot colors) as a percentage of the total area and in cm2 and inch2. By default, the size of the rendered CropBox is used for the calculation, which can be adjusted of course. The values are displayed for the entire document and for each page individually.
Separation Previews
If you are not sure whether a file will separate correctly, or if you simply want to check the ink mix or overprint of certain elements, this report page will provide clarity. It displays all individual separation previews for process and spot colors.
As mentioned above, these pages are optional, i.e. you can choose to include none, some or all of them in your report. Step-by-step instructions on how to add the pages to your report can be found in our online documentation. So, if you're interested, just read this article and you're ready to go. In the documentation you can also download a template that already includes all five optional pages.


