Whether in your company you refer to them as cut contours (mostly for labels) or dielines (mostly for packaging) or give them another name entirely, what they have in common is that they often cause problems. Because they are incorrectly defined, or because they are missing entirely.
Cut contours and dielines
Detecting the problem
The callas solutions can easily identify the presence or absence of individual separations. This means that a PDF document that doesn’t have a cut contour element defined, can be filtered out as a problem document.

Standardizing colors
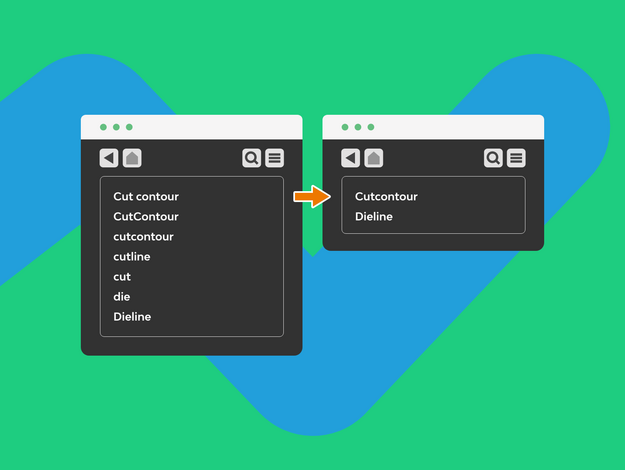
If designers at different clients supply files with different naming conventions for cut contours, the callas engine can be configured with a list of possible names, or with some regular expressions to try and detect as many as possible names, and then remap all of those into a standardized name. Imagine automatically looking for “CutContour”, “Cut Contour”, “Die”, “Dieline” and fifty other possible names, and remapping them to what you need for your digital cutting machine.
Adding cut contours
What if there is no cut contour whatsoever? The shapes engine in the callas solutions can add a cut contour, for example, based on the trimbox of the PDF file. Maybe a little bigger or smaller, depending on what you need in your workflow, with a specific thickness, set to overprint or with the color you prefer. Or in a label workflow with rounded corners so they peel off in an easier fashion. Alternatively, you can even add a cut contour based on the actual design in the PDF.


Using cut contours
If your PDF file does come with a cut contour present, you can of course use it. Perhaps you want to a varnish layer anywhere inside the cut contour or add bleed around it or remove all elements outside the cut contour or report on text that comes too close to it. All of those are easily possible.